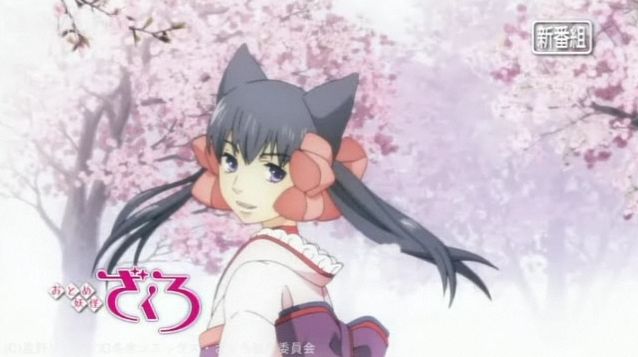
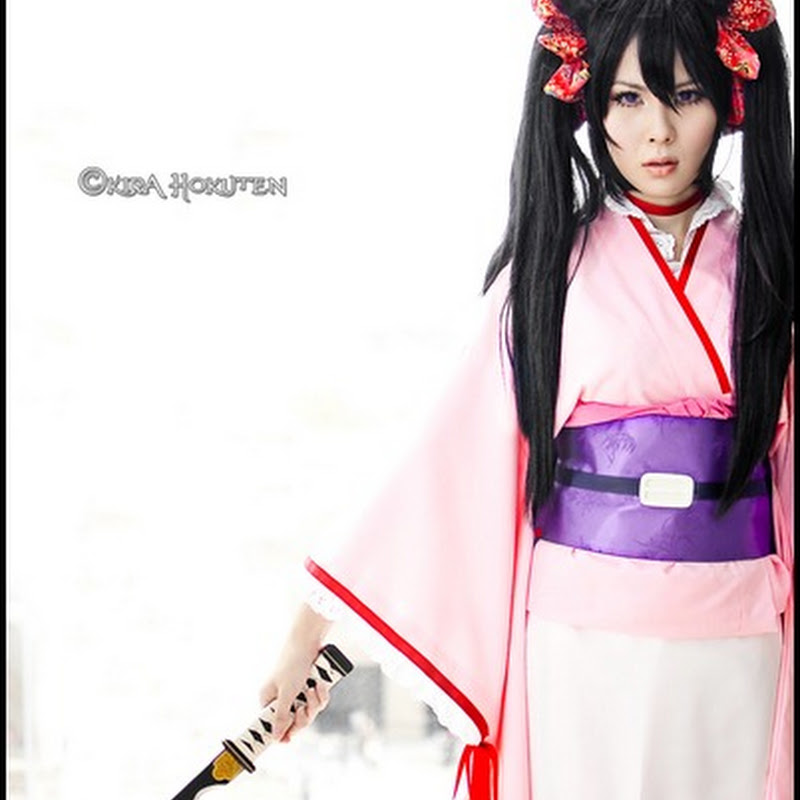
Hi guys! Here to share with you how I made my Otome Yokai Zakuro costume! I hope you guys aren’t tired of these entries yet ^^;;. Now let’s hope this entry will help someone out there!
Check out more photos of the cosplay here.

Kimono
When I first looked at the costume, I thought that it would be easier to wear the Kimono if it was a 2 piece instead of a the traditional one piece. Hence, against my better judgment, I made it into a top and bottom. I was of course, upset to find out that making them separately not only did NOT significantly ease the wearing, it also made the dressmaking process so much more tedious!
My advice? Just make a one piece Kimono!
Oh, second advice, please don’t use cheap fabric for Kimonos! Traditional Kimonos are made with superbly good fabric and while it’s kinda silly to spend a bomb on a hobby costume, it’s still no excuse for you to use overly cheap fabric either. The outcome/effect of using the right fabric is especially obvious in Kimono Costumes.
In case you’re interested to know, I used Polyester Cotton fabric for the Kimono. I love Polyester Cotton for their drape, solid colours and ease of handling. They don’t crease easily either!
Check out this video to learn how to make a Gi top. Written instructions here. Extend the fabric and you can make a full length Kimono.

If this method is too complicated, I found an incredibly simple Kimono pattern online that you might want to check out. Link here.
Obi
The entire Obi is basically made of fabric and interfacing. The Interface allows for the Obi fabric to look stiff and authentic so don’t omit it!!! Even the bow has interfacing =) Because I didn’t have enough brocade fabric, the inner part of the Obi was done with a different fabric ![]() Little tips to help save a tiny bit of cost.
Little tips to help save a tiny bit of cost.
The red edge are ribbons glued on with my trusty fabric glue.

I knew I wouldn’t have the time and skill to tie my obi every time I wear the costume. So I made a fake bow and fixed it onto a long rectangle tube fabric. As you can see from the pictures, the rectangle fabric has velcros on it. I simply wrap the rectangle fabric around my waist and fix up the velcro when I wear it.


Because I was so anal about the structure of the bow, I even inserted wires into the tails of the bow so as to force it to stick out.

To secure the bow itself, I tied the centre portion together with a red ribbon. For added security, I also made sure I hand stitched it.

The bow before I stick it to the rest of the Obi.

I then wrapped another fabric around the bow and tails to finish up the entire bow.


The tails are detachable and the entire Obi can be wrapped up like this for easy storage.
Fox Ears
I first test and trial with papers before deciding on the final shape and size of the base that will make the fox ears. After that, I cut 2 piece of fur fabric in the shape below. Kind of like a crescent moon with a nose.

Folded them in half and hot glue the edges together. Remember to leave a gap for you to insert some cotton into it! 
I don’t have any pictures of the subsequent steps. but basically you fill in the cotton and then seal up the gap with hot glue. After that, hot glue your preferred hair clip onto the ears
The hairclips I used hairclips were close to something like these.

Hair Scrunchie
Many cosplayers used 3 ribbons for her hair bows but for some reasons, it seemed more like some fluffy sort of scrunchie to me.

So I made a long rectangular fabric tube and sew an elastic band to the fabric tubes at the “ X ” points.

Remember not to sew the elastic band dead onto the fabric tube because that might cause your elastic band to become un-stretchable. Just sew some sort of belt loop for the elastic band to go through. Start by making a fabric tube, divide and get the right points to sew your loops, then sew the ends of the rectangle tube together.
It basically ends up looking like a flower of some sort, like the picture below. The Green “ X ” are the points to sew a ‘loop’ for the elastic to go through. The blue band is a representation of the elastic band.

****************************************
Overall, I would say this is a relatively complicated costume. It looked simple on first sight but if you want to execute it properly, it will and has proven to be quite a task. No wonder traditional Kimono costs so much!
I had to do a lot of research about Kimono and specifically Furisode (young female’s kimono with very long sleeves). And I implore all Kimono costuming Cosplayers to do the same. The knowledge you get from the research really helps give your costume a touch of realism!
Again, I’d like to reiterate the importance of selecting the right fabric. Never EVER use cheap cotton for the Kimono unless it’s a Yukata which is worn in Summer. Traditional Kimono emphasises very much on the quality and drape of the fabric so there’s nothing worse than cotton Kimonos imho.

Here’s a picture of me laying the costume on the floor to gauge which red ribbon is more suitable as the trimming. Yes, I’m anal.

What’s worse, I do scary things like Photoshop-ing a rough sketch of the costume on me to see how I’d look with the full costume. It’s so anal I’m ashamed to share this //_\\. But I’d defend myself by saying this is a really effective way to ensure the final product compliments your body shape and height.
Of course, it’s not like photo shopping the picture will make the costume fit better. What it does is give you an idea of how to tweak the costume to fit your body shape/height better. For example, with Photoshop, I can gauge whether the fabric compliments each other. I can gauge if my Obi is too wide or too narrow for my height. I can gauge if my hair bows is too big or too small. I can gauge if my lace needed to be narrow or wide … and the list goes on!
I don’t know about you, but I HATE redoing costumes. I hate having to redo any parts more than once. So as much as I can, I aim to ace it on the first try (it doesn’t work often though T_T). Nothing worse than finishing the costume only to find out your costume is too long/short/tight/high/makesyoulookfat/un-proportionate right?
Some people might argue that tweaking the costume will make it less accurate, which I must say, isn’t incorrect. But let’s just say I prefer to look presentable than end up looking awkward because I insist on dead accuracy. Anyway, those people who criticise won’t be there to praise your Costume accuracy if you end up looking fat, stubby and ugly in your costume =x
There’s a lot more minute details and efforts spent on getting this costume to where it is now but I shall not bore you guys with my anal talks. I mean, talks about how anal I am. Not that specific body area *cough*.
Anyway, hope you guys enjoyed reading this entry and remember to leave a comment ^_^!


No comments:
Post a Comment